DO IT YOURSELF CANOE D-RINGS
by Karen Baker-Jarvis
Introduction by Donna Grimes:
I'm not home yet from my 7-1/2 week trip, but while we were paddling in Colorado, one of the gals showed me how she made D rings... since one of mine had "popped" again! She says this is what all the racers use since the "ring" is lighter, holds better, and is cheaper than buying any other D ring. Here is her report on how to make these canoe D-rings.
Canoe D-Rings made with hollow tube climbing webbing
These D-rings are used by racers and boaters. They are very lightweight, extremely strong and inexpensive to make.
- Buy hollow climbing webbing and cut to length. Use 9/16” webbing or 1’’ webbing. The webbing is sold at REI: www.rei.com/product/610111 The webbing is Blue Water climb-spec tubular webbing. There are two widths of this webbing. Use the smaller for gear and maybe larger for thigh straps.
- Buy West System two-part marine-grade epoxy which is excellent for royalex canoes (#105 Epoxy Resin, #206 Hardener). Always check with the manufacturer to determine what your canoe is made of and if this is the appropriate type of glue. Be sure to check the air temperature and humidity to determine drying time.
- Lightly sand area to be glued and clean with alcohol. Wear gloves.
- Surround area to be glued with masking tape with a round hole on each side so extra glue does not run.
- Cut webbing to length. Leave enough length so that center protrudes up so that a strap fits easily through the hole. Find a cylindrical tube to fit under webbing while it is being glued so that it does not slump.
- Cut about 1 inch slot or more on both sides of webbing and also on both
ends. This equals 4 cuts.
- Fray the ends that are cut so that individual strands are visible.
- Mix glue according to directions. You can let glue thicken slightly so it is more viscous. Brush glue in correct spot (use correct type of paintbrush for epoxy) then dip frayed ends into glue and position in boat. You can arrange the frayed strands with your fingers or some kind of comb so that they form a half circle on each side and look very neat. Put the cylindrical tube through center at this time.
- For the first hour or so of drying, wipe off excess glue that has run onto tape. When the webbing is glued to the sides of the boat, e area to be glued must be level so that the glue does not run.
- After the glue has cured about two days, there will be sharp edges that need to be sanded.
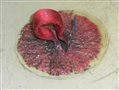 |
Do it Yourself D-Ring
|
Above is a picture of some webbing we put in a few years ago. It is probably better to have a space between the two sides so the webbing does not stick up, but lays flatter for straps.