| Boat Builder's Corner |
| |
| by |
| Skip Johnson |
(Continued from previous issues.)
Finishing Up
Now we’re so close to being done you can almost taste it, but still
there’s a bit to do.
Bulkheads fore and aft are in order, they form part of the “box”
structure in the ends (along with the decks) that gives the boat its
torsional stiffness. I like to make the bulkheads from left over strips
glassed on both sides just like the hull. If you’ve done some accent
strips of the like in the hull you can repeat the pattern in the
bulkheads. This works best for accents high in the hull.
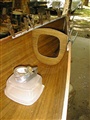 |
| Bulkhead |
| All photos by Skip Johnson |
To make bulkheads from strips first make up a blank a little oversize
and tape the strips together on one side with two or three strips of
duct tape. Then fold the joints open one at a time and run a bead of
titebond glue in the joint. Doing this over the edge of a workbench
works pretty well for me. Weight the blanks down flat somewhere and let
the glue dry. Then sand both sides smooth and glass with 4 or 6 ounce
cloth, doing one side at a time is probably easiest, but if you’re in a
hurry you can do both sides at once and hang up on an edge or just lay
what will be the back side on a piece of visqueen or other plastic.
Make patterns for the bulkheads from some stiff cardboard, if you are
putting in vertical bulkheads it’s easy to get the shape from the
station patterns. For angled bulkheads it’s a matter of successive
approximations of cut and try to get the shape right which is a matter
of being within an eighth of an inch (1/8”) more or less, an exact fit
is neither necessary or desirable.
A short digression on water tightness of end caps is in order. I used
to think that sealing up the ends of a canoe was the way to go,
providing floatation and buoyancy. After pinning a nicely built 14’
solo under a railroad bridge on Cypress Creek some years ago and then
having to drill a drain hole in the ends to drain the water out, I’ve
changed my mind about end caps. Now I add a hatch cover or a Tupperware
container in the bulkhead and fill the end cap spaces with some large
ziplock bags full of foam peanuts.
Back to the bulkhead patterns. The patterns need to stop a half inch
plus from the top of the gunnel to allow for a half inch thick foam sub
deck plus the thickness of whatever deck you use, full thickness strips
of some thinner veneer. When gluing in the bulkheads remember to pre
wet the exposed wood edges of the bulkheads with neat epoxy to prevent
the fillet of thickened epoxy from getting all crumbly from the epoxy
soaking into the raw edges. I find it easiest to glue the bulkheads in
on one side and let the epoxy set before filleting the other side.
Somewhere along here you need to add an extra strip to the outside of
the gunnel, here I use a ¼”x ¾” strip with one edge beveled at 45
degrees. If you’re really looking for the ultimate in little details
this rubbing strip looks really good if tapered in the widest
dimension. Easiest way for me to do this is to glue the full width
strip in place letting the top edge run wild above the sheer then
trimming off the excess on the ends after the glue has set. Gluing two
12 foot pieces of limber wood on the hull takes a lot of clamps and
gluing the inwhale in place is going to take about the same number.
Really cost effective clamps can be made from 1” to 1-1/2” wide rings
of 3 or 4 inch PVC pipe with a slit cut in them to make “C” spring
clamps. Use care in cutting the PVC pipe, it’s easy to have a round
section get away from you while cutting.
For decks I like to use a piece of ½” blue extruded polystyrene foam as
a core with a layer of 4 or 6 ounce glass on the underside. Once this
is glued into place the top can be covered with strips or veneer of
your choosing.
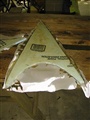 |
| Underside of deck |
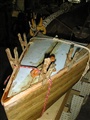 |
| Gluing in deck |
Last item before putting that final layer on the deck is the inwhale.
I’m very partial to the spaced inwhale used on EasyB. The width gives
the gunnel enough stiffness that no center thwart is needed, the open
spaces make it easy to roll the boat up on its side and drain all the
water out of the boat and, most importantly, you have a multitude of
places to strap, tie, bungie and otherwise fasten stuff to the boat.
First order of business is to get a piece of 1 ¼” dowel and rip it in
half, remembering the admonition about cutting round things. Then round
off the sharp edges making two 36” or 48” pieces with a flattened oval
shape. Finish with a couple coats of epoxy followed by varnish, much
easier to do at this stage. Then cut into ¾” to ? thick pieces,
consistency is valued here. Next is gluing time. For those with a
steady meticulous manner you can glue the spacer blocks on the hull,
let the glue set and then glue the inwhale on. It’s not that hard to do
it all at once but it does take a little preparation and an extra pair
of hands can help. In either event it is very important to precoat the
end grain of the spacer blocks with epoxy, these joints are important.
Actual gluing is with epoxy filled with wood flour to the consistency
of peanut butter. To me, the array of clamps on each side of the boat
always looks like two caterpillars in the early stages of courtship.
This pretty well finishes up an overview of building a stripper and
finishes the year to boot. I wish one and all a joyous season and fair
weather in the New Year. Drop me a line if you’ve got any suggestions
or subjects you would like covered this next year: skipj@oplink.net
 |
The author,
Skip Johnson |
~~~
The End ~~~
|
|